 Before starting your garage door opener installation, you will need to get together the following items to use on the installation and additionally check a few things. You will need to make sure that you have an electrical outlet located where the opener motor will be installed, as you will one within three feet of the motor. Also, you will need an electrical wire that runs from the same area where the motor will be to a separate location where the main garage door switch will be located. If your system has safety sensors and/or a garage door frame key-panel included, you may need electrical wires ran to them as well.
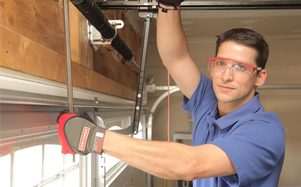
As far as tools needed for the garage door opener installation, you will, more than likely, need all of the following: the actual garage door opener, a drill, a hammer, a pencil, a stepladder, a measuring tape, screwdrivers, drill bits, a 2x6 board, pliers and safety glasses. Remember if you're unsure about attempting the process on your own.... call a professional. If you decide to do this on your own, we are not responsible for any injuries. Installation Steps: Step 1 - With the garage door open, measure the distance between the top of the opened garage door and the ceiling. The track for your garage door opener must be a minimum of two and a half inches above the opened door. Now close the door and mark on the wall above the door at 2 and a half inches. This mark will be the bottom of your header bracket. Now install a 2x6 on the center line of the garage door from the ceiling down to the top of the garage door frame. The board will be where you attach the track that has the chain. Step 2 - Attach the door bracket to the garage door as per the factory recommended location. Certain companies supply extra brackets to reinforce the garage door, or you may need to reinforce the garage door yourself. Now, you can attach the header bracket to the 2x6 that you added above the garage door. Make sure that you have enough clearance for the garage door. Step 3 - Assemble the garage door opener as per the provided instructions. After this is completed, you can then insert the end of the track into the bracket that you just installed on the 2x6. Now, raise up the motor end of the opener and place it on top of the stepladder so that you can measure exactly where it needs to sit without holding it. Step 4 - Mount the motor to the ceiling per the recommended method from the manufacturer. Make sure that the track that has the chain runs at a 90 degree angle from the garage door. Next, attach the door arm that is on the track to the bracket that is on the garage door. Step 5 - If your system has safety sensors, you can now install them on each side of the garage door. They usually need to be installed about six inches from the floor, but anywhere from 5-10 should be ok. Just make sure that both sides are equal. Now connect the wires to your sensors and to your garage door frame key-panel (if needed). Step 6 - Plug in the garage door opener and test the system. If the garage door opener functions correctly, you can move on to adjusting the limit switches. As per your manufacturer's instructions, adjust the open and close limits with a screwdriver. Now, your garage door installation is complete, and you can enjoy the ease and convenience of having a garage door opener. Once you have had the pleasure of using a garage door opener, you will never be able to go back to not having one.
1 Comment
4/9/2017 09:44:53 am
I have express a few of the articles on your website now, and I really like your style of blogging. I added it to my favorite’s blog site list and will be checking back soon… Leave a Reply. |
AboutA great place for bargain shopping or for a quick and easy personal loan. Archives
May 2018
Categories |
 RSS Feed
